It has come to the end of the year, what feels like a very quick year, and a lot has been learnt in this time. Lots of fun and lots of hard work!
I would say that the main thing I have learned from the filming experience especially during the group project was that there is so much more paper work to be done, you cant just go out and film. From permission to film to release forms there are many things to complete to do a project!
I have also learned that time management is essential, if you don't assign and plan when you are going to achieve something by, chances are you wont get it done on time and before you know it, it is a week before the deadline and there is still tonnes of work to do!
My favourite "day" project from the year has to be this one:
OH MY GOD! from James Harris on Vimeo.
Not only did it make for an entertaining mini project but it also involved working in quite a large group and making creative decisions all together!
The one thing I would change about my year was to re-do my individual project as technically it was not my best piece and if it were for a few checked camera settings the whole thing would have turned out far better.
Thank you everyone for a great year :) bring on the next one!
Showing posts with label 4002. Show all posts
Showing posts with label 4002. Show all posts
Tuesday, 18 May 2010
Tuesday, 11 May 2010
The Journey: The End!

Today I finished my individual project The Journey. I am ready to admit it is not my best piece of work, but considering the technical problems I have had it hasn't come out too bad and has definitely taught me a lot of lessons.
The first and most important thing I have learned is to check that the camera is set up properly at the beginning before pressing record. If I had checked that the image quality was set to high rather than standard my feelings about the whole project would have been different and the finished product would have looked far less amateur. The plus side of me not using the uni's Panasonic cameras meant I saved a lot of time not having to log and capture though. Another problem with camera set up meant my footage came in in 4:3.
The composition of sounds I think works very well and I think that the variety of landscapes I managed to capture keeps the film engaging. I did try to make the film a little bit shorter, but to keep it in time with the music it works better at the length it is. The music used really keeps the film moving and having edited the clips to the music beats they work well together.
I accept that technically my film is by far not of high quality, but I am hoping that the idea and the range of media (including animation) used will remind/help show how much work I put into it.
Friday, 7 May 2010
Individual Project: Editing Process
After taking a whole evening of after finishing editing the group project it is back to work on editing the individual project.
I began by bringing all my clips in chronological order from filming I began to piece together the clips to give a variety of landscapes and scenary. My first concern was at how samey and boring the piece looks, so I tried to keep the use of the animation clips I had put together equally spaced out to break it all up.
Thursday, 6 May 2010
Individual Project: The Search for a Soundtrack

Now that I have all my footage together I am ready to start editing but need to find a music track to go with my project before I start it in order to get beats with the music etc.
Here is the criteria I have in mind:
- I am looking for something ambient and electronic so straight away I know I am looking for something without lyrics.
- I want something with a strong pace but nothing that has overly strong bass as I still want to keep it quite light.
- Something that gives some sense of movement or travelling
- Something with a defined start and end
- Nothing that will distract too much from the images
And so the hunt begins!
After trying to find music online and not having great success, I looked a little closer to home and found music by a friend who is studying music here at uni. Toby Kaar makes electronica music and he has given me permission to use his song Bread which I think will go perfectly with the feel of my piece
Tuesday, 27 April 2010
Individual Project: Progress
Just before coming back to uni I filmed with my Dad who was the driver and got the sequence of him getting in and starting the car. Also in the last week at home I took 450 pictures of a toy car and managed to put them together in Fridays session to make the clips of animation.
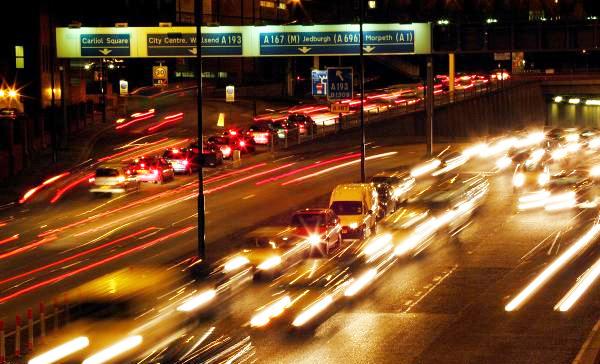
At the weekend I am making a trip to Cornwall and may use this opportunity to get some footage of cars on the motorway from a motorway bridge (which I did not manage to get before) and also some footage of traffic lights.
So after Wednesday when all the group work will be finished it will be all good to go on the editing for my project and though I am sure it will take longer than I expect I am going into it with a clear vision of what I want so hopefully it wont be too stressful!
Tuesday, 6 April 2010
Individual Project: Filming/Idea Progress
Over the weekend I did the main bulk of my filming for The Journey on a drive up to Scotland to visit family. As predicted though the weather was awful and I ended up shooting the moving shots from the interior of the car through a slightly filthy windscreen/passenger window.
Having taken into consideration that my footage isnt as good quality or quite what I was expecting it to be (due to the weather which was obviously out of my control) I have been thinking of other ideas which I will carry out:
- A short stop take animation of a toy car going along the route we took on a map
- Adding the driver as a character with a quickly cut sequence at the start of the driver getting in the car and starting the engine
- More photography
- Sequence of traffic lights
Friday, 26 March 2010
Fridays FCP- Final Cut Practice!
Today we looked at colour correction within FCP. To do this we took one of the group cooking projects to edit.
These are the steps we went though:
Firstly we went through the clip and made markers within the Viewer (if we had the original FCP file this would not have to be done), from this we were prepared to make subclips. It is useful to name the shots and add a description for future reference.

After doing this you can make subclips and set them up in a new bin within the browser...

Using these you can recreate the film in the timeline...

Once you have done this it is time to add the effects, for this exercise we are looking at colour and exposure correction so for this you need to use Color Collection 3-Way, when you arrange the windows you get different graphs to work with...


We will focus on using the waveform and vectorscopes and then we can edit the settings using the Color Corrector within the viewer.


You can keep an eye on what you are doing by comparing with other shots using the tool bench on the right hand side.
This is the result of our work this morning:
I have realised it is a very slow process doing this colour correction work, the clear way to make it easier on yourself is to set and keep correct exposures throughout filming. The more you do this the less editing work you will have to do later on in the process.
Friday, 19 March 2010
Keyframing&Animation

In todays session we had a go playing around with key framing to get a small animation done.
Using Final Cut Pro in particular the Viewer window you can edit the key frames to change certain settings of an image such as: Scale, Rotation, Center, Anchor Point, Opacity and several other functions.

To get the image ready for using in the first place you must use Photoshop to edit the image so that it has no background by using layers and alphachannels.
Once the image is ready and saved as a photoshop file, it can be imported into Final cut to be used in combination with any images/moving image you may have.
I chose to keep my work simple but amusing and this is what I came up with:
It is a useful tool and I'm sure it will come in handy for creating interesting titles or short animation sequences in the future. It is quite difficult to get the knack of but once you know what you are doing and what you want to achieve it is quite easy to carry out....though often requires lots of waiting around for media to render!
Individual Project Time!
For the 4002 module we are required to make an individual project, it takes the same nature as the Group Projects in that it must be 5 to 8 minutes long and we pretty much have the choice to do whatever we want.
I want to go back to an idea covered earlier in the year of montage and develop this into moving image which I have not looked at before. As I like the idea of looking at traveling and taking journeys I have come up with the following proposal:
“The Journey” is a short (between 5 and 8 min) short film which will be a montage piece about a journey in car between Bristol and Scotland. It will be a majority of moving image but will also include some still photography.
The narrative of the film is already written in that the journey has a beginning and an end. The aim of the piece is to focus on aspects and scenery in our country to remind the audience of what we have in this country as the common assumption is that traveling involves going abroad.
I am as yet undecided on whether or not to include the driver as a character as nature is the main focus of my piece.
There will be no dialogue or diegetic sound and the footage will be accompanied by appropriate music to reflect the locations filmed and will be very atmospheric/ambient.
I have chosen to do this piece as this particular journey is one I have done several times and I find the changing of landscapes over the time it takes to complete the trip visually impressive. The differences in locations and also time of day over the length of the journey is something I wish to focus on.
Tuesday, 16 March 2010
Instructional Video: Final Edit

As promised here is the final edit of our instructional cooking video filmed last week:
1..2..3.. cooking show from Anthony Sahdev on Vimeo.
Overall I am really happy with our video but if I were to approach the project again I would experiment with using a voice over as the projects I have seen by other groups have used this really well. I feel as though we have met the criteria of the task.
The thing I found difficult as I'm sure the rest of the groups did was many of the recipies could take anything up to or over 10 minutes to make in real life and having to condense that down into instructions of 3 minutes was quite hard.
I like the style we did our video in as if I were to be making the food I like not having the distraction of having a presenter and delivering short, clear instructions with simple visuals that are easy to follow.
Friday, 5 March 2010
Storyboard
Another Friday brings another day preparing for filming. Though for our 4003 Group Production we are doing a documentary, it is still good practice and will be useful for future productions to look at storyboarding and the most useful way to go about doing this.

Though traditional storyboards are thought of as endless pieces of scibbly paper drawings, again we can use Celtx to create a more visual, tidy and portable storyboard for our productions. Today we were given a one scene script, and after finding the beats within the scene and deciding upon our shot types we took the Panasonic cameras out and shot individual pics for each shot to upload to Celtx.


For a more universal file format you could also use your sequence of images in Quicktime Pro, set how long you wish to spend on each photo and export it as a Quicktime Movie. The downside of this is you cant include the text but it does give you a good idea of how the scene will flow. This is what our images from this mornings exercise came to as an outline to the scene. (Please ignore my face at 10secs...Ed knows how to capture me at my worst obviously!)
The useful thing about making a storyboard in this manner is that is gives opportunity to practice the framing of shots without the actual actors having to be present. As you can see the photos don't need to be very precisely done and don't need to be well acted to give you an idea of what you want to include in a scene.
Though traditional storyboards are thought of as endless pieces of scibbly paper drawings, again we can use Celtx to create a more visual, tidy and portable storyboard for our productions. Today we were given a one scene script, and after finding the beats within the scene and deciding upon our shot types we took the Panasonic cameras out and shot individual pics for each shot to upload to Celtx.

Celtx allows you to upload each photo into its storyboard layout, select shot type from the drop down menu and add a short description of your shot. Once you have done this you can play these pictures within the programme as a slideshow which will include the short description as shown below:

For a more universal file format you could also use your sequence of images in Quicktime Pro, set how long you wish to spend on each photo and export it as a Quicktime Movie. The downside of this is you cant include the text but it does give you a good idea of how the scene will flow. This is what our images from this mornings exercise came to as an outline to the scene. (Please ignore my face at 10secs...Ed knows how to capture me at my worst obviously!)
The useful thing about making a storyboard in this manner is that is gives opportunity to practice the framing of shots without the actual actors having to be present. As you can see the photos don't need to be very precisely done and don't need to be well acted to give you an idea of what you want to include in a scene.
Wednesday, 3 March 2010
Instructional Video Filming

For the 4002 module, we have been asked to complete a short instructional video lasting aournd 3 minutes, aimed at students covering cheap and healthy eating.
I worked in a group with Ant, Harry and Simon, we filmed this afternoon in Ant's kitchen making a pasta dish.
The stages we went through in planning how to film the video was as follows:
- Break down the recipe
- Decide which order to film stages (e.g. all chopping to be done in one go)
- Pre-plan certain shots
- Work out timings of food being cooked
- Film!

For example, we were cooking a pasta dish but preparing everything else within the recipe first, this meant that once we had done all the chopping and prepared all the sauce we had to wait just over 10mins for the pasta to cook before we could continue with filming. This does give time to review the work done so far but the waiting around can be annoying!

I have learnt that cooking videos are not as easy as they look and they take a lot of scheduling when you cant afford to or dont have the resources to make multiple versions of the dish. Programmes like Ready, Steady, Cook! and the live sections of Saturday Kitchen have the pressure of getting everything right for live audience, but a pre-filmed cooking video has the same problem and requires a lot more preparation than I originally thought.
Stick around for the edit!
Friday, 26 February 2010
Z1 Camera & Interview Practise

Friday has come round again and today we got more use of the Z1 cameras in preparation for filming our group projects for 4003. Instead of using just the camera itself we used external recording audio microphone connected through XLR lead.

After spending some time looking at how to set up the camera and audio combined and all the settings required to capture the audio and video with desired preferences, we made one-on-one interviews in our groups. We used Rachel and Chloe as our willing subjects who talked about holidays.
The problems we came across were continuity as they both moved quite alot when talking. At one point Chloe looks into the camera, this was easy to cover up with a 'noddy'. Though the excercise was focused on improving out audio recording skills there are several points within the edit I wish we could have edited to be a bit smoother.
However in terms of matching up audio I think it is quite seamless which was the main idea behind the exercise. The one thing I have learned from today is that even if your interview footage may not be as useful or as good as you expected it is easy to have fill shots and 'noddys' to make up for it.
Not these kind of nods though...
Friday, 12 February 2010
Oh My God- The Finale!
It took 3 weeks and 2 groups with 2 angles but tpday we shot the final shot to our 'Oh My God!' films. We chose to go for a comical ending as we thought it would be more fitting with Ed's reaction face that the film ended on last time.
OH MY GOD! from James Harris on Vimeo.
Can't really give much explanation as to why we did this ending other than it was a random thought mainly courtesy of Ed to see Ant dance!
We added credits to the end to finish it off and used the following song by Tom Jones as our soundtrack:
OH MY GOD! from James Harris on Vimeo.
Can't really give much explanation as to why we did this ending other than it was a random thought mainly courtesy of Ed to see Ant dance!
We added credits to the end to finish it off and used the following song by Tom Jones as our soundtrack:
Sunday, 7 February 2010
Different Methods of Camera Handling
In Fridays session we looked at the various ways in which to handle a camera in order to get a stable picture. The main 3 methods of this are:
Tripod
The tripod (as it suggests) works with 3 legs, each can be adjusted to varying heights, many come with a spirit level to just the level of your shot, they are very sturdy and stable.

Advantages: most stable, provides spirit level, can be adjusted to various height, strength/endurance of cameraman not an issue, pan shots can be very smooth, good for panorama and multi angle filming, support from wider base
Disadvantages: heaviest and bulkiest, not good in tight spaces, slow to adjust/move, heaviest to carry to/from location
Monopod
A monopod uses just one 'leg' to support the camera, however it is not just to be used as a 'leg' but the monopod can also be used as a lever to hold the camera up off the ground as well as stabilising it on it. As with the tripod its height can be adjusted easily.

Advantages: smaller and more compact than tripod, light and easy to set up, takes up less space so can film in smaller spaces, multi purpose, can allow minimal physical stress on cameraman (depending on how it is being used.
Disadvantages: only has one point of stability, can get sideways shake, not alot of flexibility in shots
Fig Rig
The 'fig rig' was created by director Mike Figgis at the time of the making of one of his films. The fig rig works by providing the user with a control similar to a steering wheel for controlling the camera. The controls of the camera can be linked up to a device on the wheel itself. Further info can be found here.
 A
AAdvantages: easily portable, easy to use and set up, relatively light, distributes weight of camera, allows fluid camera motion
Disadvantages: cameraman could have limited space, hard to put down and leave safely, once camera is picked up must be continuously held, doesn't eliminate and side to side shake motion
Friday, 29 January 2010
Using Celtx
 In todays session we have been using Celtx in order to deconstruct a scene. This is aiming to help us know how to construct a scene when it comes to making our group projects for 4003.
To do this we used the car chase scene from 1968 film Bullitt starring Steve McQueen. The scene is different from modern day car chase scene in that the shots tend to be longer, the longest one of which is around 18 seconds long.
A thing we were told to bear in mind when looking at the shots was whether or not they kept to the 180 degree rule of filming.
 Sticking to the rule means that filming will be kept in the right direction allowing continuity between shots and preventing audience from being confused about the direction/set up of the shots they are watching.
Characters/objects in the shot should keep the same left/right relationship, and when an object is moving, for example a moving train, if in the first shot the train goes from screen left to screen right it should continue to do so throughout the sequence.
This is part of the deconstruction from the scene with some details to what is going on in the shots themselves:

From this exercise and the ones we have completed in previous 4003 sessions it can be seen that not only is Celtx useful for pre-production storyboarding, but also to deconstruct/analsye existing work.
Friday, 15 January 2010
Interlaced vs Deinterlaced Footage
When preparing footage for viewing there is one key thing to consider, where the footage is going to be viewed. This falls into 2 categories:
- TV: Footage needs to be interlaced
- Visual Display Units (VDU's): Footage needs to be deinterlaced
A clear way to illustrate the difference is in the following images, with footage from Finding Neverland. Both clips have been paused at the same point (give or take a few milliseconds), the snapshot on the LEFT has been deinterlaced, whereas the one on the RIGHT is still interlaced.
The noticeable difference here is motion blur.


 A further thing to consider when editing is the gamma setting on the display unit, this is different between Macs and PC's, this means the image will be brighter. The image on the left shows the setting on a Mac and the right hand image shows the equivalent on a PC.
Friday, 27 November 2009
Final Cut Pro

In todays session using Google Documents I created an instructional slideshow on the basic tools/uses with Final Cut Pro.
We used screen shots from Final Cut Pro using clips loaded onto the Macs.
Wednesday, 18 November 2009
Soundscape Assessment
I chose to do my soundscape of shopping, through my recording I found it leaned more towards supermarket shopping.
Here is the link to download my finished edit.
The problems I found during the recording that as I was always recording in crowded areas there was a lot of background noise and I found it hard to get clear cut sounds such as till beeps.
I found the editing stage quite easy to do once I got into it, but it was most difficult knowing where to start! I wanted to tell a story in that it starts by someone getting out cash, their trip to the shops (fom quiet to quite chaotic) and ending with them leaving. I did not aim to make it sound realistic which is why the middle section is a jumble of sounds.
Hope you like it, comments welcome!
=]
Friday, 13 November 2009
Panorama Ephemera vs Brian Eno
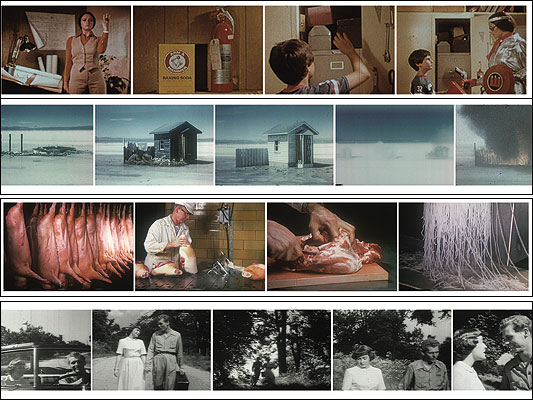
n todays session we practiced using Final Cut Pro to edit together footage from Panorama Ephermera together with the song America Is Waiting by Brian Eno&David Byrne:
Taking sections of our choice from the film we took a one minute section of the film and edited together using a sequence. Using FCP we used tools such as markers, making subclips and editing audio levels as well as adding some effects.

Ephemera vs David Byrne from Kirsty F on Vimeo.
Taking sections of our choice from the film we took a one minute section of the film and edited together using a sequence. Using FCP we used tools such as markers, making subclips and editing audio levels as well as adding some effects.
The main problem I had with the excercise was having to contstantly render the video in order to watch it during the editing process. In therms of the music there weren't many good hit points either which made it quite difficult to arrange the video sequences.
This however is what I came up with =]
Subscribe to:
Posts (Atom)