Friday, 29 January 2010

Using Celtx

http://www.boston.com/ae/movies/blog/Bullitt.jpgIn todays session we have been using Celtx in order to deconstruct a scene. This is aiming to help us know how to construct a scene when it comes to making our group projects for 4003.

To do this we used the car chase scene from 1968 film Bullitt starring Steve McQueen. The scene is different from modern day car chase scene in that the shots tend to be longer, the longest one of which is around 18 seconds long.
A thing we were told to bear in mind when looking at the shots was whether or not they kept to the 180 degree rule of filming.

http://dom1wom.files.wordpress.com/2009/09/0000000-pedobear.jpg Sticking to the rule means that filming will be kept in the right direction allowing continuity between shots and preventing audience from being confused about the direction/set up of the shots they are watching.

Characters/objects in the shot should keep the same left/right relationship, and when an object is moving, for example a moving train, if in the first shot the train goes from screen left to screen right it should continue to do so throughout the sequence.


This is part of the deconstruction from the scene with some details to what is going on in the shots themselves:

From this exercise and the ones we have completed in previous 4003 sessions it can be seen that not only is Celtx useful for pre-production storyboarding, but also to deconstruct/analsye existing work.

Friday, 22 January 2010

Group Project: Initial Ideas


http://stan.uio.no/blog/isne/film%20reel%202.JPG


We are staring work on our group video project and our task by the end of the day was to come up with an idea, find groups and submit a proposal.
http://www.eden.co.uk/images/300/ACMGOSP1.jpg
I have chosen to work with Ed and Mike, Ed had the idea of doing a documentary on the choir he is in called ACM Gospel Choir. I myself wanted to do something either documentary or music based so this idea really appealed to me. Here is our treatment so you can get an idea of what we hope to work on:

We intend to make a documentary following the progress of the ACM Gospel Choir. To Tell the story we will have one on one interviews as well as live footage of the choir, to show the progress we will also contrast the footage by using some archive material and some from BBC.
Though we will not neccessarily have one story running throughout, the choir itself are the spine of the documentary and the use of a voiceover will also help hold the piece together.
the ACM Choir are based in Guilford, Surrey and rehearse and perform regularly including featuring on BBC One#s Last Choir Standing in Summer 2008. Their development has been quite rapid and this is what we aim to give an insight on within the documentary.
Another aspect we will focus on is to look at particular members of the choir who have their own side projects, this will also give an insight on the struggle to become professional, successful musicians.
We will go to Guilford to film rehearsal process and also go to one or more of their gigs to get a good range of footage. In terms of how we film it we will use traditional documentary style filming but will also include some backstage hand held camera footage to add a personal touch (in the form of video diary) as well as contrast.

For more info on our chosen topic please visit the ACM website.


Tuesday, 19 January 2010

Scheduling

http://www.eecs.harvard.edu/~uribraun/img/schedule.jpg
In todays session we looked further at pre-production and looked at creating a schedule. The function of the schedule is for it to be a document that all crew and cast can read and immediately understand what is going on with shooting.

Key details to be included on a schedule are:
  1. Contact details of cast/crew (name, phone number, email address)
  2. Local contacts (can be used as tick list for release forms)
  3. Equipment details (and contact for technical support)
  4. Directions/map with transport arrangements (cast often has transport organised for them whereas crew are expected to make their own way)
  5. Arrival times
  6. Shooting schedule (in as much or as little detail as you feel appropriate.
To make a professional standard schedule you need to include up to date contact details, detailed directions are good (but a Google map or equivalent is often better) and a realistic time scale for shooting.


Friday, 15 January 2010

Interlaced vs Deinterlaced Footage


In todays session we were shown a Powerpoint  looking at  compression and how to output using different codec's.

When preparing footage for viewing there is one key thing to consider, where the footage is going to be viewed. This falls into 2 categories:
  • TV: Footage needs to be interlaced
  • Visual Display Units (VDU's):  Footage needs to be deinterlaced
If you dont use the correct format, you wont get the best quality material on the chosen output. For example, interlaced footage on a DVU will be blurred and can look like a double image, wheras deinterlaced will be clearer and sharper.

A clear way to illustrate the difference is in the following images, with footage from Finding Neverland. Both clips have been paused at the same point (give or take a few milliseconds), the snapshot on the LEFT has been deinterlaced, whereas the one on the RIGHT is still interlaced.
The noticeable difference here is motion blur.


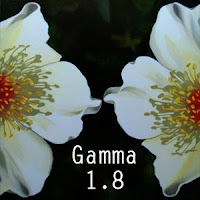
A further thing to consider when editing is the gamma setting on the display unit, this is different between Macs and PC's, this means the image will be brighter. The image on the left shows the setting on a Mac and the right hand image shows the equivalent on a PC.

Tuesday, 12 January 2010

Using Celtx


In today's session we used Celtx in order to create a storyboard to use for shooting. The new 2.7 version of the free software allows you to use a sketch feature which helps those who cant draw to well.
Using the sketch feature we created overhead shots for a made up script. The advantage of this is that you can make clear pictures of the set that any member of crew would find easy to follow. You can add as much or as little text detail as you wish.

At the end of the 2 scene worth of inputting you get something like this:
From this you can also add images from a camera, which we went on to do. Once you have done this the play function will work and you have a full detailed storyboard which can also be rearranged to function as a shot list.